The following tutorial covers changing of Chameleon Plone Theme global navigation width on a Plone 4 website. Instruction for Plone 3 website - see in Global Navigation Width Customization in Plone 3 tutorial.
Top area on a site with Chameleon Plone Theme installed is subdivided into three parts: global navigation, image area and right area. Width of global navigation can be set, while central and right parts width is not changeable. Global navigation width defines the whole site width. In case you change navigation width from default 215 px this will influence the whole site width.

You might need to change global navigation width in cases when your company logo width is less or more than 215 px, but you want navigation width fits your company logo width.
Let's consider the example we had in Part 1 when we have changed default Chameleon Theme logo with Quintagroup company logo. Quintagroup logo dimension is 150*73 px (we also have to count 8 px in margins), which means we need to decrease navigation width from default 215 px to 150+8=158 px.

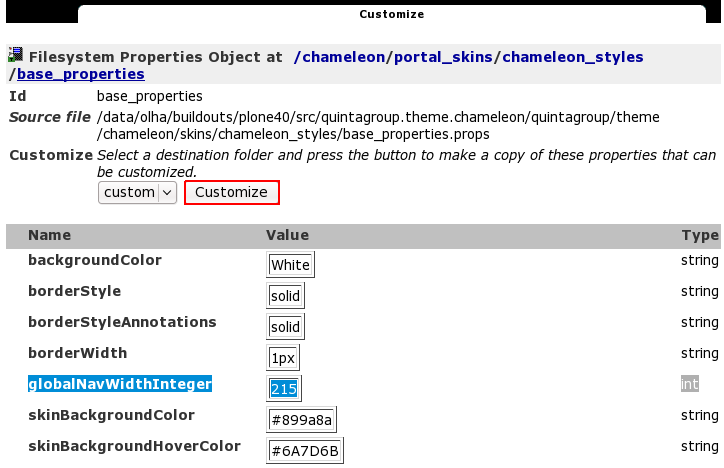
For this navigate to ZMI and open chameleon_styles folder that includes base_properties document that contains information about Plone's color, logo and border defaults:

Global Navigation width is defined by globalNavWidthInteger property. We need to customize the whole file to specify new Global Navigation width. That's why press Customize button:

Now global navigation width is 215. In case you want to change this number press Customize button. In the opened window change globalNavWidthInteger value from 215 to your new width. Let's put globalNavWidthInteger value = 192 so that navigation width fits Quintagroup logo.

Save changes. Now return to Plone Interface and you'll see your changes applied: navigation width decreased to 158 px, and now it perfectly fits company logo:

The decrease of navigation width from 215 to 158 px means the whole site width was decreased by 57 px (215-158 px).
