Products.LinguaPlone is used for Plone =< 4.1 with Archetypes
There are many products, designed specifically for translating and managing multilingual websites with LinguaPlone being one of them. Essentially what LinguaPlone allows you to do is to define what languages you want to “enable” on your website. Plone's interface and all the standard functionality is already translated for you in more than 50 languages. With that your main concern is to translate the content. In other words, if you want to add content in ten (or 60) different languages, you wouldn’t need to translate “log in” and every other built-in element on your website – the only thing you’d need to translate is the titles and text of your articles - content you added manually.
Installation
To install LinguaPlone, you’ll need to add it to your buildout and rerun it. Then go to your Plone site and activate the LinguaPlone add-on via Site Setup ->Add-ons, tick the box with LinguaPlone and click Activate.
Continue to the language control panel and specify all other languages you want to support. Make sure to specify the default language of your site. In the list of Available Languages pressing Ctrl select those you would like to have your website be translated into.
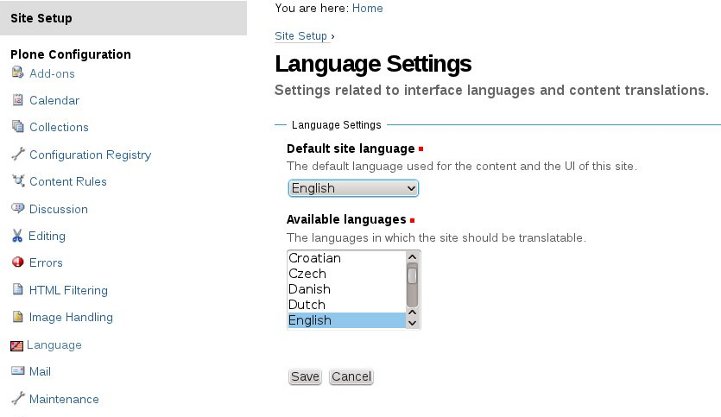
When you enable a new language in LinguaPlone, It doesn’t mean that it automatically translates it for you, but provides you the tools to manage the translated content, right in the interface.
Working with LinguaPlone
LinguaPlone is one of those install-and-go products. You don’t need to spend hours to figure out how to configure and work with it. Here, I’ll try to give you all the info you would need to work with the add-on.
We’ll take English en as a default language of the website and Spanish es as the one we want to translate our content into.
Tip 1: move all of your content into a separate folder with the language id, including the home page.
So, if your website is in English, have en folder. If you have a lot of pictures move them all to separate Images folder as well and set a neutral language for it. To enable this, switch to Edit tab, click Categorization and select Language neutral, then save the settings.
That way, you won’t need to translate them for each language, as they’ll be visible across all the language. Though you may need to update images source links on the pages.
Tip 2: always start your translation with the top level language folders.
Whether or not you have the same site structure in each of the language folders is up to you and your requirements. By using the top level language folders every URL corresponds to exactly one language which is good for search bots. It also means that you don't have folders with mixed languages in them, which will make your work or your editors a lot easier, since they don't have to worry about switching languages in the same folder just to see if there's more content in them. So, basically translate en folder with content in English into es folder with content in Spanish.
Tip 3: add content in default language first and then translate it into desired one.
What it means is that, if you are adding new content to your website, first add it to your en folder and only then translate it to e.g. Spanish. So all your translations will be comprehensive.
Tip 4: translate the content into one language at a time.
It’s much easier and will save you a lot of time in the long run, if you translate your website at first into one language only. You’ll be able to review it and find what doesn't work for you, what changes you may need to do to your design and what not. Then you won’t make the same mistakes, when translating the content into another language. You’ll know exactly all the do’s and don’ts.
After considering all these tips you have a good base to build a multilingual site.
Translating with LinguaPlone
Now, let’s open the folder that contains the home page and translate it into Spanish. Click Contents tab and then in Translate into drop-down menu select the desired language.
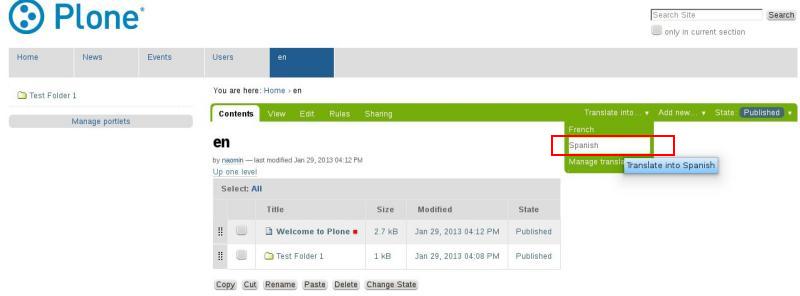
So after translating the root folder en into Spanish, you should go back to it and rename it’s shortname to es.
You can also enable editing shortnames while translating. To do it, go to Preferences, switch to Personal Preferences tab and tick the box for Allow editing of Short Names and click Save.
Finally, we can move on to translating the articles themselves. Open the needed page and again in Translate into drop-down menu select the language you want to translate your content into.

LinguaPlone provides you with a split screen view with the editing interface in the target language, so that the translator can see the original text while making the translation.
One by one fill in the fields with the translation (сheck out our tutorial on How to paste text from Word to Plone ). In my case, I translated the English text with the online translator, and pasted the Spanish version back into the interface and did some editing (linked phrases to appropriate pages, pasted images) . But, if you want, you could always allow a professional translator to log directly into the system and access the content.
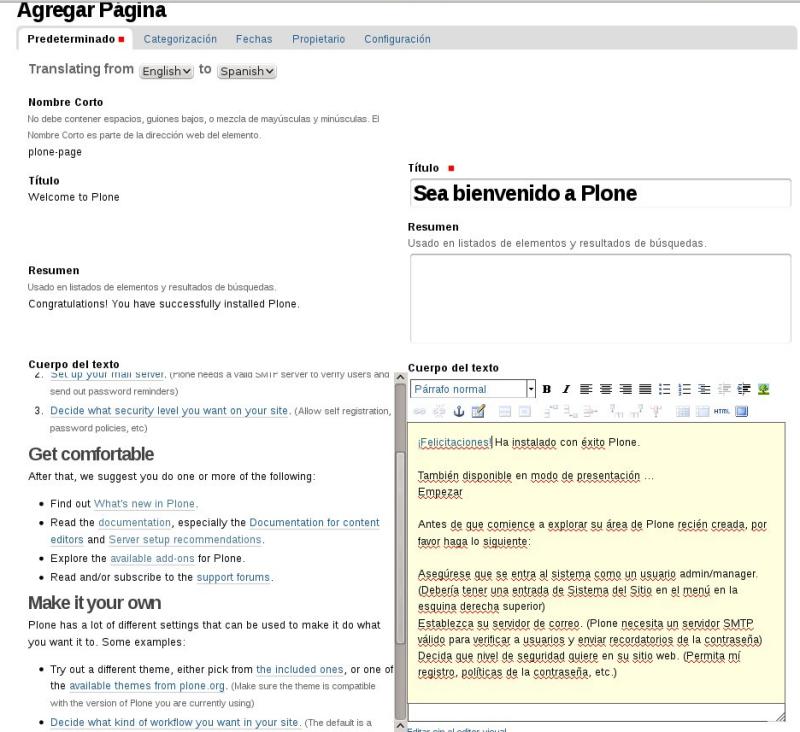
Click Save and voila - you translated the page!!!
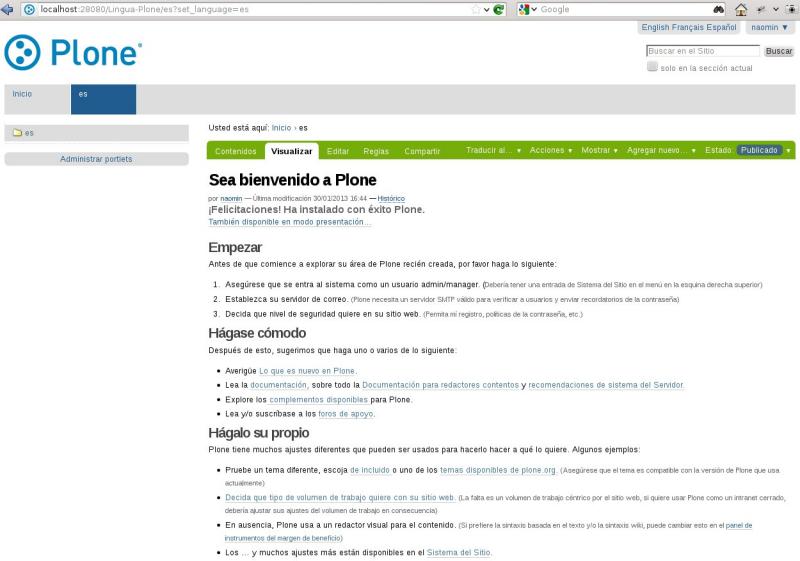
You’ve probably noticed there is another option Manage translation which lets you, among other things, change the content’s language and select a page to link it to as a translation:
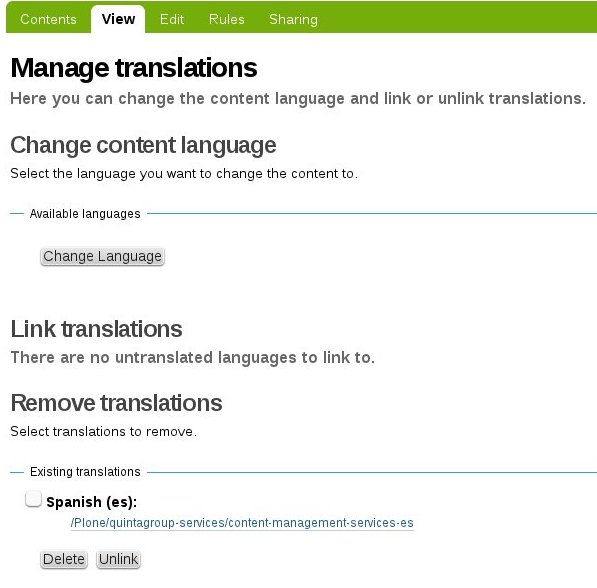
Repeat those steps, until you get the last page in the last level folder translated. Don’t forget to publish pages and set default ones for appropriate folders. It’s simple as long as you translate your website gradually, language by language, folder by folder, page by page.
Front Page
We’ve already established the fact that when setting up a multilingual site you create top-level per-language folders that act as navigation roots. The root of the site then should be set up to redirect visitors to one of these root language folders depending on the language selected.
Take a look at geabox.ch for an example of such a site Quintagroup developed. Notice that when you visit that URL you are automatically redirected to one of the supported languages, to English. You can switch between the available languages on the top left, and you'll see that the first element of the URL changes between the language codes. Those are the top-level folders. The advantage here is that each of these folders can have it's own default view.
There are two ways to do set up default view for the site root: manually or let LinguaPlone do it for you.
You can setup the language folders as a root default view simply by adding /@@language-setup-folders to the Plone site root and it automatically performs the setup. After you should get a message saying:
Setup of language root folders on Plone site 'Lingua-Plone'
INavigationRoot setup on folder 'en'
INavigationRoot setup on folder 'es'
Translations linked.
Portal default page removed.
Moved default page 'front-page' to folder 'en'.
Root language switcher set up.
If after calling @@language-setup-folders something does not work correctly, go to your ZMI interface and navigate to portal types. Now open Plone Site. You should have language-switcher set in Default view method.
How to switch between different language versions?
Visitors of the multilingual Plone site can easily switch between languages being on any page. Shifting between languages on the same site may be organized differently. You can choose the best way for you via ZMI -> portal_languages. The choice is between:
-
drop-down menu use (this is the preferred method);
-
flags use (not very convenient, as flags represent countries, not languages. Numerous countries use the language of another country, and numerous countries have more than one official language, so it can be misleading).
FAQ’s
1. How can I translate a page that was created prior to the installation of LinguaPlone?
When you’ve first started adding some content on your website, all those items could have neutral language set. What it actually does is allowing your content to be shown for all the languages.
To translate a page, you’ll first need to set a language, for that switch to Edit tab, click Categorization and select Language English, then save the settings. Now your page will have English as original language. Return to view mode and in Translate into you should see the list of languages you want to translate your page into.
2. Translating Plone UI - When I do the language switch, only the content language changes, and the UI is still in English. Does the UI automatically switch languages if the default language is not English, or does something else need to be done?
The problem lies in the LinguaPlone itself, as we’ve found out there is no UI translation for some languages, including traditional Chinese and Chinese(Singapore). But for the regional variants Chinese(Hong- Kong), Chinese(China), Chinese(Taiwan) the UI has been translated.
To enable them, go to ZMI, navigate to portal_languages. Tick the box Allow combined language codes like de_DE or en_UK and Save. Now again go to Site Setup -> Languages and select from Available languages list box the languages you need to translate your content into.
3. Missing pages
When translating folders with LinguaPlone, all translated contents are moved from the canonical folder to the translated folder with same language, translating low level folders on big depth tree sites could take a long long time, don’t be surprised if you get errors or find that there are still not translated pages.
4. How do I make some of my content visible for all the languages?
If a content is neutral (language independent), inside a translated folder, it will be visible for all the languages. To enable this, switch to Edit tab, click Categorization and select Language neutral, then save the settings.
5. What should I do when switching language does not work?
This happens if the cookie language negotiation scheme is not enabled. Look at the portal_languages tool in the ZMI and check if Use cookie for manual override is enabled.
Have additional questions? Fill us in your needs and experience Quintagroup edge, intricate care for each customer and project, big or small, business or personal!
